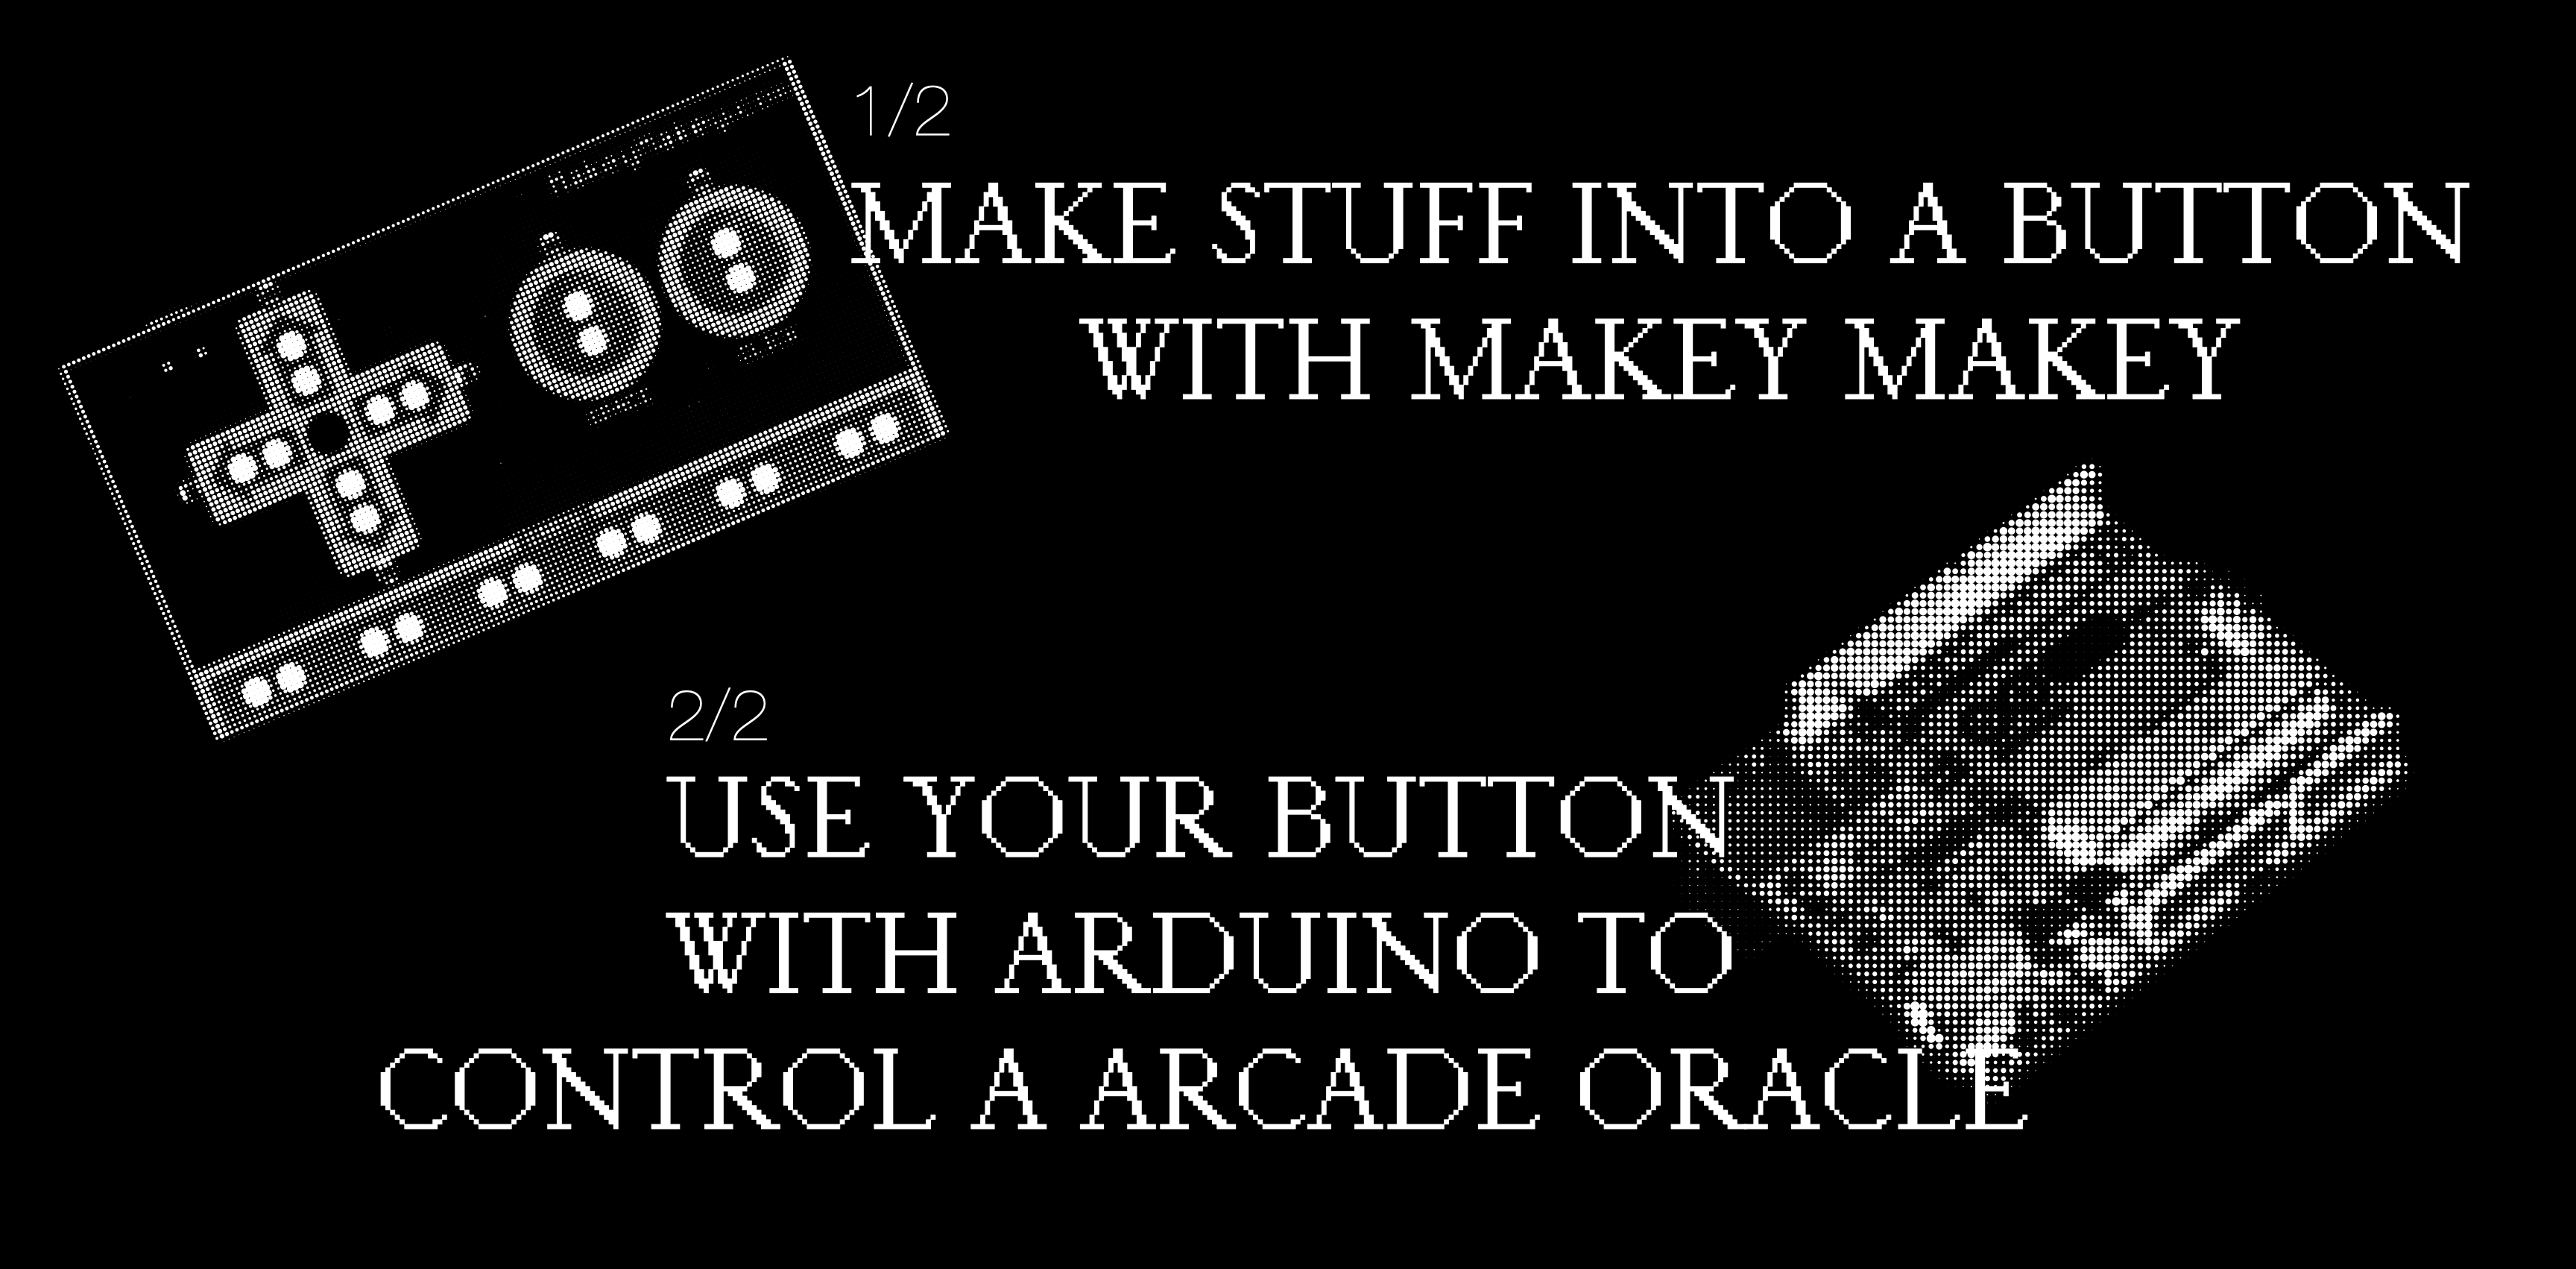
HACKING & INTERACTION & MAGIC
In this one week course, you will explore how to use interactive and
︎︎︎ Take me back to the Index
Workshop 1 + 2:
Arduino + Makey Makey
Buttons + Sensors
![]()
About Circuits and Electricity
![]()
![]()
![]()
Mail Ymer: ymer@thelivingvoid.nl
Mail Cyanne: info@cyannevdh.nl
In this one week course, you will explore how to use interactive and
generative tools in the physical world to tell your story!
︎︎︎ Take me back to the Index
Workshop 1 + 2:
Arduino + Makey Makey
Buttons + Sensors
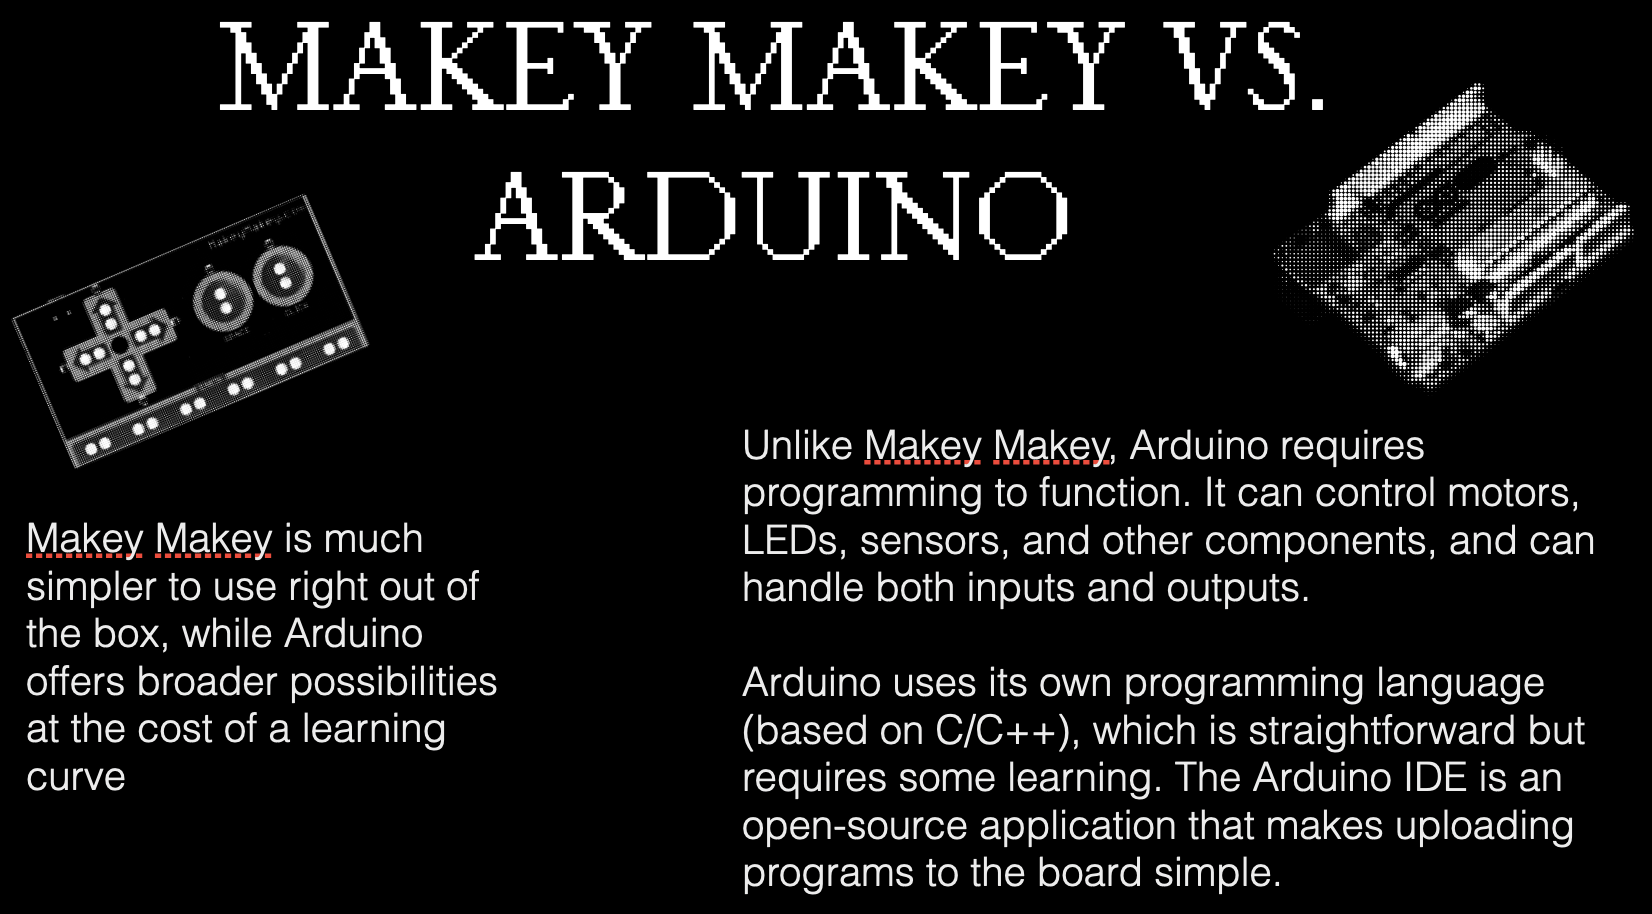
You can make your final installation with a Makey Makey or a Arduino (or however you like..)
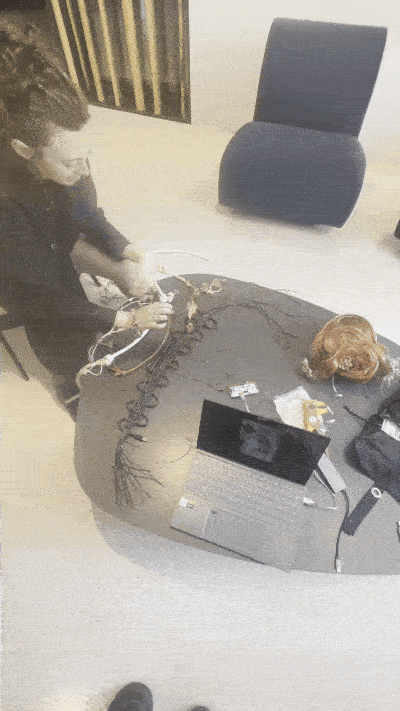
These two workshops show you the basic on how to use those to hack into existing circuits. Bring your own techno trash that you would like to hack or open up, easiest is to bring something with a button in it!
To get started with this workshop please download the following software:
Processing 4.4.1
Arduino Ide 2.3.6
![]()
The Makey Makey works with conductive materials like:
Makey Makey project inspiration and resources
2/2 ARDUINO
![]()
Arduino is an open-source electronics platform based on easy-to-use hardware and software. It's designed for artists, designers, hobbyists, and anyone interested in creating interactive projects.
With Arduino, you can:
It’s the easiest way to bring ideas to life with both code and physical components!
PLAY WITH EXAMPLE PROCESSING CODES
Direct download
![]()
![]()
![]()
![]()
![]()
![]()
![]()
![]()
You can combine the examples or tweak them to your liking,
or ofcourse think of completely new interactions. ︎
1) Experiment, extend and have fun with Processing and your micro-controller.
For every theme there is a sketch (press spacebar to interact) in the following folder. You can also work with the Oracle Processing code with Arduino or Makey Makey.
2) Think about your interactive concept.
Think of 1 or 2 themes (inspired but not restricted to this list) for your generative art concept.
3) Documentation is key!
Start documenting your work, be sure you safe all your files and sketches!
︎︎︎ Start collecting data like graphics/screenshots/photos etc. Having your own dataset will help you narrowing down the story you want to tell, but is also very useful for the content of your (generative) installation.
Extra
︎︎︎ Try to connect your sensor! Check out the Sensor Guide to see if your sensor is there. If not, the internet is your best friend, almost everything has been done - so looking up videos and tutorials of how people use this sensor can help you a lot. Also sometimes on the Hackerstore website there is a link to a tutorial for the particular sensor.
You can also reuse the example Behind the Black Wall codes,
that play with themes from my research about rogue chatbots - and are easy to tweak:
![]()
Works with spacebar and arrow keys on Makey Makey. Once you press it, it randomly plays a sound (.mp3) + picks a word.
Tweak the sounds by copying .mp3 files in the data folder, change the words in the code on line 12 - 29.
Change the main image by replacing: futureswheel.jpg, and the background image by: futurebg.png
You might need to install the minim library in Processing > scroll down to read how to install a library.
Code made with fellow Priscilla Benyahia ︎
![]()
![]()
Remote controls are very easy to disassemble and repurpose
Works with spacebar and arrow keys on Makey Makey. Each press chooses a random image + sound from a folder. Once you press it, it randomly plays a sound (.wav) and shows an image with corresponding number.
Tweak the sounds by copying .wav files in the data folder > folder (space, up down left), same for images(.png) Change the main image by replacing: ghosthardware.jpg, and the background image by: bg.jpg
![]()
Example made by Telemagic ︎
Works with spacebar on Makey Makey. Each press combines 3 random words with an image.
Open OracleBasicWithExplanation.pde to see explanation of what is happening exactly.
You can change the words at line 16 - 18 (words1, words2, words3).
You can change the images in the data folder, replace them with images with the same name and filetype)!
Have fun with it!
![]()
Works with spacebar on Makey Makey. Each press slows down the stream on one random image.
Tweak the images by replacing them in the data folder!
Change the sound by replacing 1.mp3 with a file with the same name and extension.
![]()
Works with spacebar, arrow keys and w a s d f g on Makey Makey. Each press plays a sound.
When pressing spacebar twice it switches between the sample bank.
Change the sound by replacing .mp3 with a file with the same name and extension.
If it's already broken or trash, you can’t make it worse! :)
You can use your Makey Makey itself as a multimeter to test what materials are conductive!
Two hacking strategies that will work during this session:
You connect in parallel with the button or circuit you want to control.
If you find a remote or toy with a button, you can solder wires to both sides of the button and control it using Makey Makey.
Strategy: Identify where the button connects. Connect wires to each side.
Use Makey Makey to “close” the circuit just like the button would.
Good for: Hacking remotes, toys, soundboards, or any button-based system.
Start from scratch or take out the original button and replace it with something fun (like foil, fruit, or trash).
Strategy: Desolder or cut the button, then run wires to your new input.
Anything conductive can become a button (copper tape, alu foil, spoons, soda cans, graphite drawings, etc.).
Good for: Creating custom interfaces.
Some more craft ideas:
Wire into metal pads of old calculators or game controllers.
Use conductive paint to draw custom remotes on paper.
Stick aluminum foil on top of found objects to create unique switches.
EXTRA:
![]()
This Processing sketch displays a fortune-telling interface that shows three random words and a background image, which change whenever the user presses the spacebar or when an external arcade button connected to an Arduino sends a "pressed" signal through the serial port.
The code is designed with extensive comments explaining how each part works, making it accessible and easy to modify.
![]()
These two workshops show you the basic on how to use those to hack into existing circuits. Bring your own techno trash that you would like to hack or open up, easiest is to bring something with a button in it!
To get started with this workshop please download the following software:
Processing 4.4.1
Arduino Ide 2.3.6
1/2 MAKEY MAKEY

The Makey Makey works with conductive materials like:
Metals, such as copper, steel, gold/silver, (pencil) graphite, alu foil, salt + liquids, such as salted water, dough or play-doh, organic (moist) material, such as humans, fruit, flowers etc.
Makey Makey project inspiration and resources
︎︎︎ How to use the Makey Makey
︎︎︎ Projects that use the Makey Makey for inspiration
︎︎︎ Get your own Makey Makey (if you end up using Makey Makey instead of Arduino - we will help you try selling your Arduino to the tech playground!)
There is a lot of nice software you can use to build interactive installations. Some of them work with keyboard triggers/shortcuts, that means no programming is needed. You just need a Makey Makey + the software, some examples are:
For fun: Play snake online to test your buttons :)
2/2 ARDUINO

Arduino is an open-source electronics platform based on easy-to-use hardware and software. It's designed for artists, designers, hobbyists, and anyone interested in creating interactive projects.
With Arduino, you can:
- Control LEDs and make light patterns or indicators
- Read sensors like temperature, light, or motion
- Control motors and servos for robots or machines
- Build smart systems like home automation or security alarms
- Make interactive art with sound, movement, or light
- Collect data from the environment and store or display it
It’s the easiest way to bring ideas to life with both code and physical components!
PLAY WITH EXAMPLE PROCESSING CODES
Direct download


You can combine the examples or tweak them to your liking,
or ofcourse think of completely new interactions. ︎
1) Experiment, extend and have fun with Processing and your micro-controller.
For every theme there is a sketch (press spacebar to interact) in the following folder. You can also work with the Oracle Processing code with Arduino or Makey Makey.
2) Think about your interactive concept.
Think of 1 or 2 themes (inspired but not restricted to this list) for your generative art concept.
- How do the theme(s) relate to what you want to achieve with your interaction?
- What function will your button/sensor have?
- What is the role of the person interacting with your design?
3) Documentation is key!
Start documenting your work, be sure you safe all your files and sketches!
︎︎︎ Start collecting data like graphics/screenshots/photos etc. Having your own dataset will help you narrowing down the story you want to tell, but is also very useful for the content of your (generative) installation.
Extra
︎︎︎ Try to connect your sensor! Check out the Sensor Guide to see if your sensor is there. If not, the internet is your best friend, almost everything has been done - so looking up videos and tutorials of how people use this sensor can help you a lot. Also sometimes on the Hackerstore website there is a link to a tutorial for the particular sensor.Code Examples with selfbuild Instruments
You can also reuse the example Behind the Black Wall codes,
that play with themes from my research about rogue chatbots - and are easy to tweak:
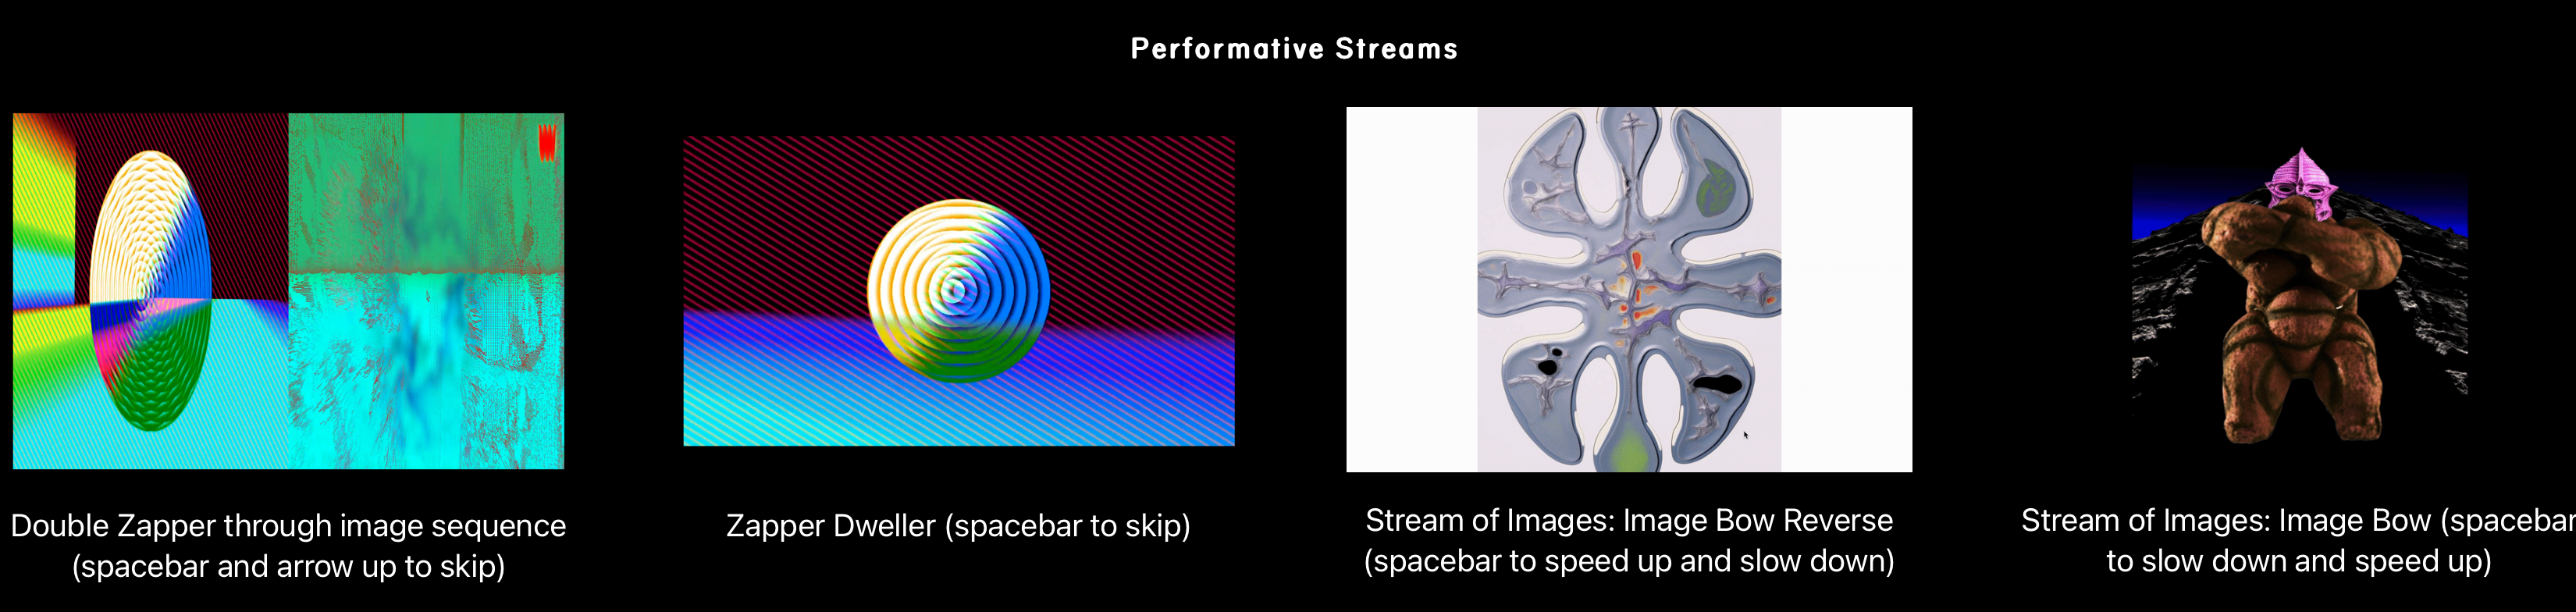
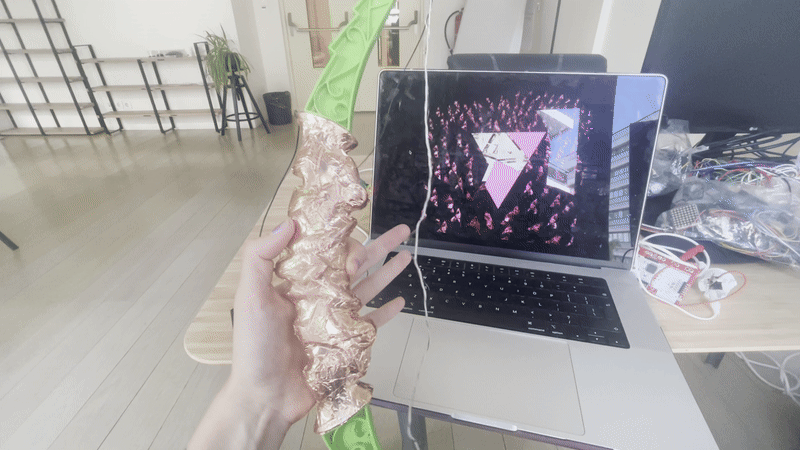
Example 1: Speculative Futures Wheel / Singing Bowl
Works with spacebar and arrow keys on Makey Makey. Once you press it, it randomly plays a sound (.mp3) + picks a word.
Tweak the sounds by copying .mp3 files in the data folder, change the words in the code on line 12 - 29.
Change the main image by replacing: futureswheel.jpg, and the background image by: futurebg.png
You might need to install the minim library in Processing > scroll down to read how to install a library.
Code made with fellow Priscilla Benyahia ︎

Remote controls are very easy to disassemble and repurpose
Example 2: Wire Instrument / Remote Control Charm
Works with spacebar and arrow keys on Makey Makey. Each press chooses a random image + sound from a folder. Once you press it, it randomly plays a sound (.wav) and shows an image with corresponding number.
Tweak the sounds by copying .wav files in the data folder > folder (space, up down left), same for images(.png) Change the main image by replacing: ghosthardware.jpg, and the background image by: bg.jpg

Example made by Telemagic ︎
Example 3: Simple Button Oracle
Works with spacebar on Makey Makey. Each press combines 3 random words with an image.
Open OracleBasicWithExplanation.pde to see explanation of what is happening exactly.
You can change the words at line 16 - 18 (words1, words2, words3).
You can change the images in the data folder, replace them with images with the same name and filetype)!
Have fun with it!
Example 4: Stream Arrow
Works with spacebar on Makey Makey. Each press slows down the stream on one random image.
Tweak the images by replacing them in the data folder!
Change the sound by replacing 1.mp3 with a file with the same name and extension.
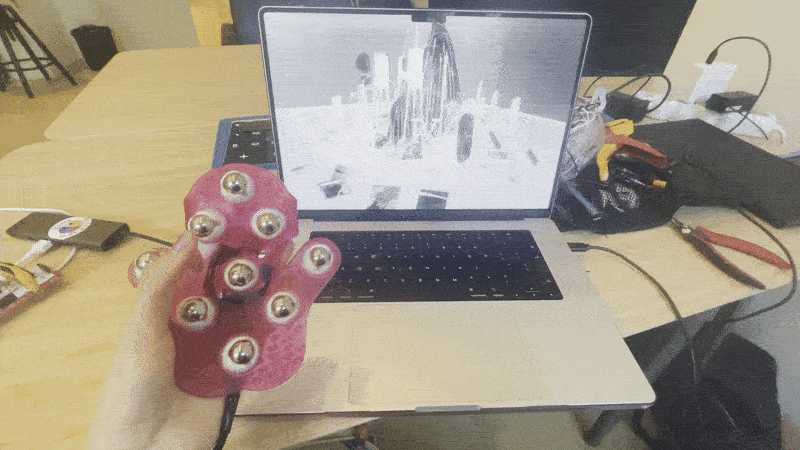
Example 5: XyloHand
Works with spacebar, arrow keys and w a s d f g on Makey Makey. Each press plays a sound.
When pressing spacebar twice it switches between the sample bank.
Change the sound by replacing .mp3 with a file with the same name and extension.
#101 About Hacking into Circuits with Makey Makey
If it's already broken or trash, you can’t make it worse! :)
You can use your Makey Makey itself as a multimeter to test what materials are conductive!
Two hacking strategies that will work during this session:

If you find a remote or toy with a button, you can solder wires to both sides of the button and control it using Makey Makey.
Strategy: Identify where the button connects. Connect wires to each side.
Use Makey Makey to “close” the circuit just like the button would.
Good for: Hacking remotes, toys, soundboards, or any button-based system.
Strategy: Desolder or cut the button, then run wires to your new input.
Anything conductive can become a button (copper tape, alu foil, spoons, soda cans, graphite drawings, etc.).
Good for: Creating custom interfaces.
Some more craft ideas:
Wire into metal pads of old calculators or game controllers.
Use conductive paint to draw custom remotes on paper.
Stick aluminum foil on top of found objects to create unique switches.
EXTRA:
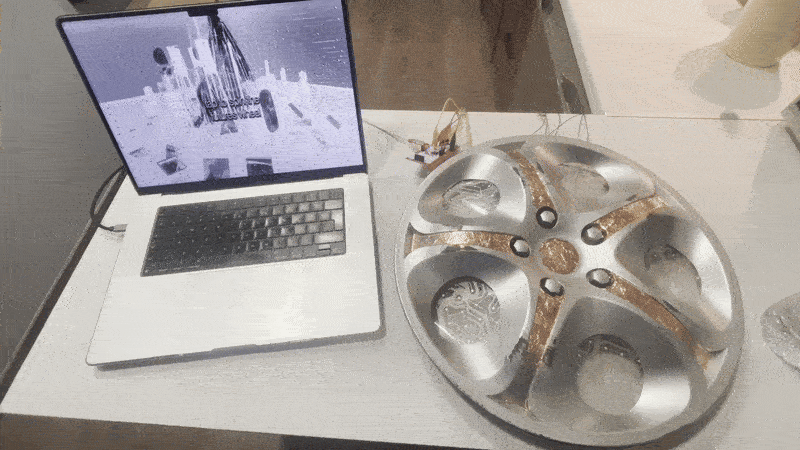
MAKING YOUR OWN ARCADE ORACLE WITH ARDUINO
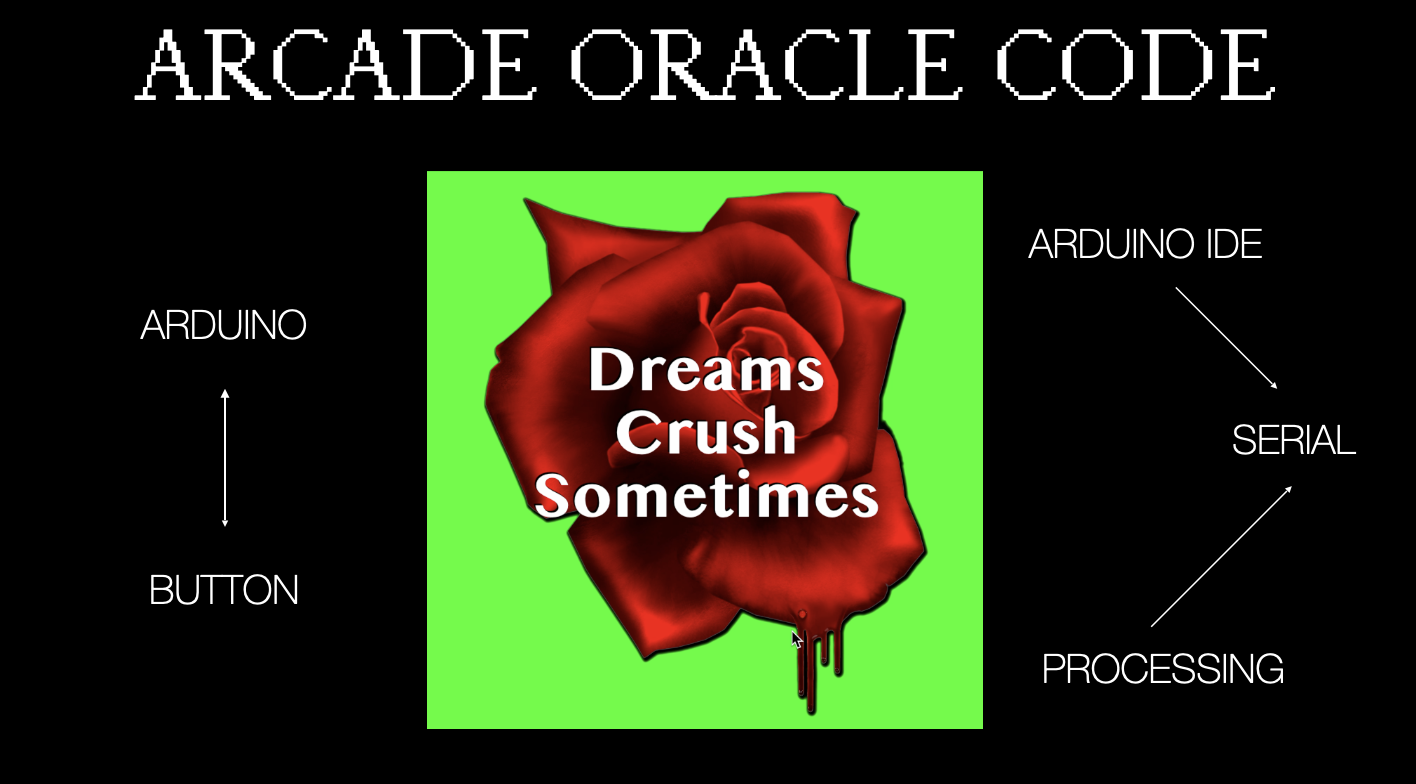
This Processing sketch displays a fortune-telling interface that shows three random words and a background image, which change whenever the user presses the spacebar or when an external arcade button connected to an Arduino sends a "pressed" signal through the serial port.
The code is designed with extensive comments explaining how each part works, making it accessible and easy to modify.
A) Install Software
Arduino 1) Download and open Arduino software: https://www.arduino.cc/en/software
2) Open the software, under “Extra”: make sure your board is set to Arduino Uno, and your serial port is linked to the one your Arduino is plugged in.
3) Download and open the Arduino sketch named: buttonserial.ino: https://rb.gy/k2wpkf
4) Upload this to your Arduino by clicking on the arrow to the right!![]()
Processing (dit installeer je om je installatie in te coderen)
1) Download Processing hier: https://processing.org/
2) Open the software, under “Sketch” click “Import Library”, “Manage Libraries” en installeer: Serial.
Now your Arduino is compatible with Processing! :)
2) Open the software, under “Extra”: make sure your board is set to Arduino Uno, and your serial port is linked to the one your Arduino is plugged in.
3) Download and open the Arduino sketch named: buttonserial.ino: https://rb.gy/k2wpkf
4) Upload this to your Arduino by clicking on the arrow to the right!

Processing (dit installeer je om je installatie in te coderen)
1) Download Processing hier: https://processing.org/
2) Open the software, under “Sketch” click “Import Library”, “Manage Libraries” en installeer: Serial.
Now your Arduino is compatible with Processing! :)
B) Download Processing sketch: Oracle
1) Download this folder: https://rb.gy/k2wpkf
2) There is one folder named OracleSerialWithExplanation (that has the explanation of every line of code used). Open this folder and open: OracleBasicWithExplanation.pde
3) Make sure you Arduino software is closed and click on play:
![]()
4) Your button will not work, because you need to set the serial port name in (line 42 of) the code.
In your console it prints something like this:
![]()
Set in line 42 the corresponding number of the Arduino (it has the same name as in the software. In my case it’s [3] because its usbserial-140.
String portName = Serial.list()[3];
Not sure what the name is check it in the Arduino Software or try out when in doubt.
5) Voila! Your button works now when you plug it in.
Some basic tips to work with the Processing sketch:
︎︎︎ Your code also works with pressing the spacebar, so you can easily switch to Makey Makey.
︎︎︎ You can change the images in the data folder (by replacing them with a file with the same name and filetype)!
︎︎︎ You can change the texts by changing the words at line 18, 19 and 20.
︎︎︎ Make sure boolean useArduino is set to true when you want to use your Arduino.
︎︎︎ Use // to uncomment(disable) parts of the code to see what changes.
︎︎︎ Use println(“whatever you want to print goes here”); to get insights into how the code works. Change numbers to see what they do in the code.
︎︎︎ Also with Sketch->import Library… ->add library . You can find loads of cool codes. And after you've imported the library you can go to File->Examples . Here you can see all kinds of examples for spells that you can learn and use (copy).
2) There is one folder named OracleSerialWithExplanation (that has the explanation of every line of code used). Open this folder and open: OracleBasicWithExplanation.pde
3) Make sure you Arduino software is closed and click on play:

4) Your button will not work, because you need to set the serial port name in (line 42 of) the code.
In your console it prints something like this:
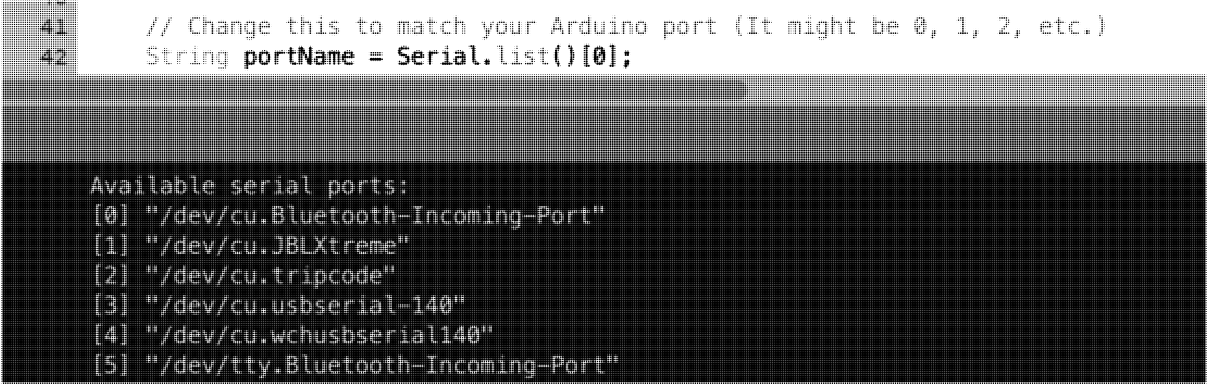
Set in line 42 the corresponding number of the Arduino (it has the same name as in the software. In my case it’s [3] because its usbserial-140.
String portName = Serial.list()[3];
Not sure what the name is check it in the Arduino Software or try out when in doubt.
5) Voila! Your button works now when you plug it in.
Some basic tips to work with the Processing sketch:
︎︎︎ Your code also works with pressing the spacebar, so you can easily switch to Makey Makey.
︎︎︎ You can change the images in the data folder (by replacing them with a file with the same name and filetype)!
︎︎︎ You can change the texts by changing the words at line 18, 19 and 20.
︎︎︎ Make sure boolean useArduino is set to true when you want to use your Arduino.
︎︎︎ Use // to uncomment(disable) parts of the code to see what changes.
︎︎︎ Use println(“whatever you want to print goes here”); to get insights into how the code works. Change numbers to see what they do in the code.
︎︎︎ Also with Sketch->import Library… ->add library . You can find loads of cool codes. And after you've imported the library you can go to File->Examples . Here you can see all kinds of examples for spells that you can learn and use (copy).
C) Hardware
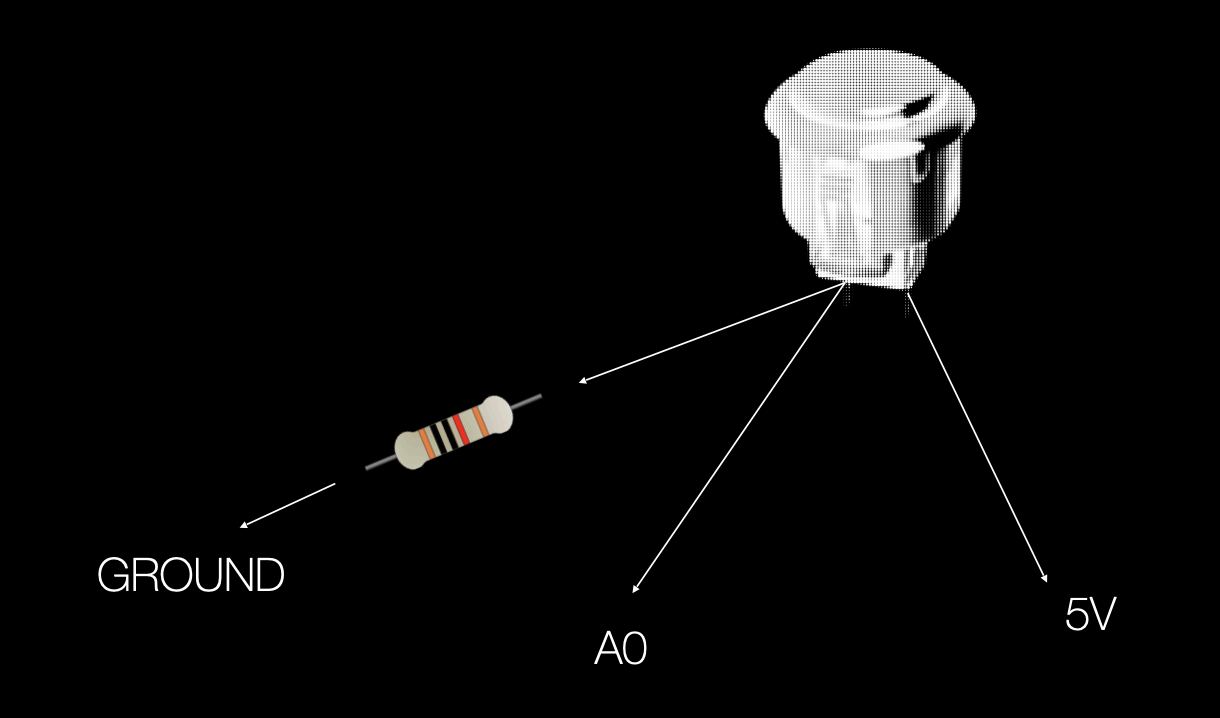
Wire the button to your Arduino, your button has two connections.
︎ Connection 1: Single wire that goes to 5 v
︎ Connection 2: Two wires: Wire 1 is connected to resistor and goes to ground (GND). Wire two is next to resistor (10kΩ) and goes to A0.
Solder the wires to make sure they last!
︎︎︎Tutorial video: How to Solder
Is your button connected? Now your Oracle Processing sketch should work if you hit play!
Didn’t get it to work after class hours? Try pasting your error into a LLM like Claude for help, send us a screenshot by clicking this link or bring it next week!
About Circuits and Electricity


Mail Ymer: ymer@thelivingvoid.nl
Mail Cyanne: info@cyannevdh.nl